

There are a total of 16 multiplayer maps in Call of Duty: Modern Warfare 3, with 20 new maps being released via DLC each month for 9 months and each of them will have unique attributes. Some of the maps suit tighter, intense close-combat fights; others are more suited to snipers and long-ranged assaulters, while a few offer equal opportunities for all types of classes.
Arkaden
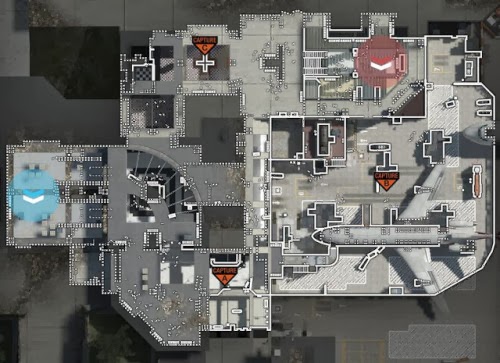
Arkaden is a SAS vs. Spetsnaz map. It is set in a heavily demolished mall in Germany. As the noun ‘mall’ suggests, the map consists of quite a few tight corners, steep stairways and narrow corridors.Hence this map is particularly suited to users of Sub-Machine Guns and Shotguns, and of course explosives. The map features both in-doors fighting and out-doors combat, though the former will be more dominant due to the relatively larger in-doors area and its strategic importance.

When it comes to team-based game-modes like TeamDeath Match or Search and Destroy, the SAS spawn in a walkway in the streets of the map. They must then make it into the mall from the front sides, with a restaurant being adjacent to the entrance of the mall.
The Spetsnaz spawn at the other end of the map, termed as the ‘back alley’. Through the back alley, the Spetsnaz can enter the mall either through the furniture area or the café. There’s also a crashed helicopter next to the double-stairs near the furniture room, which can be an interesting position to defend.
Once upstairs, the central area of the mall, which is also the central area of the map is exposed. This is the place where most of the fighting is going to happen.
The main area also has an information booth, which can be a tactically useful position. However, don’t use it too often, as from the enemy’s perspective it can also be one of the most obvious hiding places in the map.
Bakaara
Bakaara is a PMC vs. African Militia map. It is set in a sub-urban rundown African city, with the central area being a crashed helicopter. It has quite a bit of similarity to the map Crash from CoD4. Due to the open and relatively large nature of the map, it is best suited for long ranged weaponry like Assault Rifles, LMGs and Sniper Rifles. The PMC spawn nearer to the crashed helicopter, much like in Crash from CoD4. They can then head directly towards the restaurant and neighboring houses, but the best thing would be to abandon the parameter patrol and stay near the crashed chopper zone.

Bootleg
Bootleg is a PMC vs. Spetsnaz map. The map is set around an Asian town and market place. It is generally large, but due to its almost claustrophobic nature, it is best suited for Sub-Machine Gunners. Assaulters and LMG users also have a role to play, as there are quite a few narrow-but-long areas in the map, suited for such weapons. The PMC spawn near the market, while the Spetsnaz spawn near the scaffolding. Honestly, neither have a good strategic spawn advantage; which team covers the essential regions of the map first determines the victor.
This map generally has poor visibility due to the color combinations, and the rain noise can be troublesome for those who wish to do some foot-hearing. In fact, this map is generally troublesome for most, as it is difficult to go from one place to the other in this map. Additionally, there are lots of opportunities for campers in this map. Generally, the map seems awfully similar to Chinatown from CoD4. Your best bet in this map is to flank the enemy once their position(s) is known. Since getting from one end to the other is a difficult task, it is generally best to cover selected regions instead of trying to dominate the map. The core of this map is the central building, which has round about six different entrances. It is very unwise to be in the center of that area, unless you have your team covering the entrances.
Carbon
Carbon is a PMC vs. African Militia map. This map is medium ranged, but has a variety of types of areas suited for all four weapon types. The PMC spawn near a big pipe while the Militia spawn near a Factory. The advance for both teams is pretty straightforward, and involves frontal fighting with a bit of cover options in nearby buildings and factories. The best idea in the map is to run and gun, as it is quite straightforward. The only complexity it has is from the different types of buildings.
For aggressive players, it’s all about sprinting from one building to another, and clearing them out. Anyone who can do that in this map is going to totally dominate it. Additionally, for team games, a sniper or two can assist the more aggressive players by monitoring the open areas, while the assaulters can move forward slowly and take out any flankers or left-behind enemies. Success in this map depends more on raw combat skills and basics instead of strategy, so this is definitely a map where the real pros are going to shine. Of course there are places for campers here, but campers won’t be too successful as the map is more about aggressive play then it is about hiding and patience.
Dome
Dome is a Delta Force vs. Spetsnaz map, and is perhaps the smallest map in MW3. Due to its small and wide exposure, all weapons except Sniper Rifles should do the trick here. In Dome, Delta Force spawns near a tank where Spetsnaz spawn near the satellites. Delta Force can infiltrate the offices immediately and cover the entire place from there, where Spetsnaz will have to work their way through the center satellites and dome. The dome can be covered by Spetsnaz, but you can expect opposing assaulters to have their eyes open for any sign of movement.
This is an extremely intense map. The best thing here is to remain in cover and try not to sprint too much. The ideal method is to remain steady in the exposed regions, whereas in the offices you should have the shotgunners and SMG users patrolling. The map overall resembles Vacant from CoD4, with intense fighting both in the open and inside the corridor-filled offices.
Downturn
Down turn is a Delta Force vs. Spetsnaz map, set in a demolished New York City. This is an extremely testing map, as it has both indoor fighting and fighting in the streets. All types of weapons can be used in this map, but it’s best to use a setup that gives you decent range, has good in-the-face fighting capability, and allows you to be mobile. Delta Force spawns near a few taxis whereas the Spetsnaz spawn near a truck. Both teams have equal opportunities to enter the narrow underground subway area, which extends through majority of the map.
Fallen
Fallen is a Delta Force vs. Spetsnaz map. It is set in a derelict Russian ghost-town. There is a lot of greenery in this map as nature gradually takes over the place. This map is suited for snipers, as there are plenty of high spots and good camouflage. The Delta Force spawns next to a set of grey apartments, while the Spetsnaz spawn near a playground. The map is quite similar to Overgrown from CoD4, with a lot of opportunities for snipers and plenty of buildings with high story windows. This map is all about camping in windows if you’re a sniper. If you’re an assaulter, you could follow the same footsteps, though snipers would be a huge threat, or you could do what SMGs can do in this map, which is to stealthily clear out each house, moving from house to house.
Of course it isn’t as easy as said, since transitioning from one house to another will require you to expose yourself for a short while, which can get quite dangerous. It’s very essential to use the destroyed trucks and in-tact cars as cover, but it’s always better to stay inside where snipers can’t see you.
Fallen Map Tactics Walk through Video
Hardhat
Hardhat is a Delta Force vs. Spetsnaz map. It is set in a construction site of medium size, and is optimum for SMG lovers and Shotgun users. The Delta Force spawn next to the trailer, whereas the Spetsnaz spawn near blocks of cement. This map somewhat has a resemblance to Backlot, especially in-terms of density. It is a map with a lot of cover points, and some open areas for assaulters to have a look at. The key in this map, as was with Backlot, is non-stop motion.
Hardhat Map Tactics Walk through Video
Interchange
Interchange is a medium sized map featuring Delta Force vs. Spetsnaz action. This map is uniform throughout in its open spaces, and is best suited for Assault Rifles and LMGs. The Delta Force spawn next to some barbed wires, whereas the Spetsnax spawn near crates. Both teams have a great strategic starting region, as they can either advance cover to cover, or attempt to flank each other.
Interchange Map Tactics Walk through Video
Lockdown
Lockdown is a medium sized map featuring Delta Force vs. Spetsnaz action. This map is set in an urban European city center. Due to its large nature, medium to long-ranged weapons like Assault Rifles, LMGs, and Sniper Rifles will do the trick. The Delta Force spawn next to some cars, whereas the Spetsnax spawn near a dumpster. Once again both teams have equal opportunities in this map. The most essential thing in this map is to quickly occupy the buildings, whether sniper, assaulter or SMG user.
Why? Because it is very important to make sure enemy snipers don’t secure the buildings, as that could make life for players on the streets very hard. Generally, if your lost in this map or don’t know what to do, then you are definitely going to feed kills to the enemy team. The map really requires one to be aware of it, because snipers and assaulters await those who are lost. It’s best to be mobile in Lockdown, but the mobility should be limited to some objective. Without any objective or plan set in mind, wandering will definitely get you killed easily in this map.
Mission
Mission is a PMC vs. African Militia map, set in an uneven African colonial settlement. The map’s build is quite unique, as it has an area that is raised while another area that is dug into the ground. Due to this height difference and the general openness of this map, it is best suited for snipers. In Mission, the PMC spawn in a church while the African Militia spawn near a cart.
Mission Map Tactics Walk through Video
Outpost
Outpost is a Delta Force vs. Spetsnaz map. It is set in an icy Siberian airbase, and is one of the smaller maps in Moder Warfare 3. Since the map is so small, the instinctive pick would be SMGs and Shotguns. However, snipers can also find themselves efficient in this map due to its open nature. In Outpost, Delta Force spawn near a garage, while Spetsnaz spawn near a yellow building. The idea in this map for both teams – or for anyone actually, would be to go from one warehouse to another. This is an ‘infiltrate and clear every building’ type of a map, so your best bet is try to stay indoors, going from one place to another.
Outpost Map Tactics Walk through Video
Resistance
Resistance is a GIGN vs. Spetsnaz map. It is a well-lit map with a mixture of area-types. There are some regions which are great for snipers, while many are fantastic for close-quarter combat. You can use any sort of weapon in this map, though shotgunners would need to be a tad bit careful. The GIGN spawn in the streets, while the Spetsnaz spawn near a café. The core objective of this map for both teams is to make sure they avoid exploding cars, as there are quite a few of them in this map.
Resistance Map Tactics Walk through Video
Seatown
Seatown is a SAS vs. Inner Circle map. It is set in a coastal town and marketplace. This map is best suited for Assault Rifles, SMGs, Shotguns and/or LMGs. The SAS spawn in a circular tower, while the Inner Circle spawn near a green door. The Inner Circle spawn gives them a bit of an advantage as the can spread out quickly. The SAS spawn near the outer ring of the map, and must make their way through narrow corridors.
Seatown Map Tactics Walk through Video
Underground
Underground is a SAS vs. Spetsnaz map. It is set in and around a London subway station. This is a versatile map, so any kind of weaponry can work here. The SAS spawn near the streets, while the Spetsnaz spawn near an orange barrel. Both teams have great chances of entering the central train areas, where intense fighting can be expected. Additionally, both the SAS team players can choose to immediately enter the train station and cover that region.
Village
Village is a PMC vs. African Militia map. This map has a variety of terrain types and quite a bit of greenery, so all kinds of weapons can work here. The African Militia spawn near a tanker while the PMC spawn near a cave. The PMC can quickly enter the cave and a great opportunity to flank the African Militia. The African Militia can enter the village area directly and try to reply to the flank.
DLC - Liberation
Liberation is set in New York! It's one of those maps that has such iconic locations in it, that you can easily call it out "I'm at the Castle" or "We're fighting by the fountain" For Liberation, I think on of the big strategies that you want to try and follow is - there's a lot of Sniper sight lines.... and you need to be cautious when you're crossing them. Don't Run & Gun - a little more methodical, and that's going to help you survive that map.
DLC - Piazza
Piazza is a different kind of Map all together. It's a very vertical - chaotic - route map. It's primarily geared towards the guys who like the really close up Run & Gun. You gotta be fast..! It's a challenging map, it's a technical map, but also it's important to stick with your teammates where they're covering a few cover points and you're covering a few, is definitely the way you're going to survive that map.
DLC - Overwatch
Overwatch is set upon a New York City skyscraper, so you best be not be afraid of heights. It’s currently in construction, and there is many opportunities to get a quick kill between very tight openings in walls and etc. My advice for this map would be to use a sub-machine gun, and try and control the top levels. By doing this, you will be able to see more and will be able to see the enemies running below you.

Overwatch Map Tactics Walk through Video

Black Box Map Tactics Walk through Video

Sanctuary Map Tactics Walk through Video


Terminal Map Tactics Walk through Video


DLC - Black Box
Air Force One crash lands in the rich hills of southern California. Multi-level homes overlook the neighboring streets, creating a deadly kill zone for players on the ground. With clear sight lines from house to house, however, snipers are far from safe, with counter-sniping an ever-present threat to their dominance.
DLC - Sanctuary
A large outer circuit opens up long sight lines along the perimeter, circling a central monastery filled with tight hallways and sharp corners. Success requires the ability to focus your attacks and wait for the right moment to make a move. You can play it safe by sticking to the outside, but you’re likely to get left out of combat as the battle moves on.
DLC - Foundation
Foundation's abundant verticality challenges teams with key vantage points surrounding the environment. While the upper levels give a clearer view of the field, however, multiple entryways allow easy access for ground units to flank and surprise snipers attempting to gain an advantage. Coordinate with your teammates to best determine enemy location and take the ground with the least exposure.
Foundation Map Tactics Walk through Video
DLC - Erosion (Face-off Map)
Set in the crumbling ruins of an ancient civilization, Erosion features abundant twists, turns, and deep verticality. Spatial awareness and flanking tactics are essential to your survival. Take advantage of nearby pathways to overcome your opponent and deliver a deadly flanking attack.DLC - Aground (Face-off Map)
Set within a desolate arctic coastline, Aground is composed almost entirely of open ground, leaving little time between skirmishes. A cramped walkway in the ship’s hull and natural outcroppings in the nearby cavern offer some cover, but it won’t take long for the enemy to hunt you down.

DLC - Oasis
A luxurious Middle Eastern resort, Oasis requires the perfect balance between fluid movement and cautious defense. While expansive overall, each section is segmented into a close-knit arena, making short-range ambush a constant threat. A few choice perches lend snipers a clear view on distant targets, but head to head combat leads the majority of skirmishes.
DLC - Getaway (Face-off Map)
Set in and around a palatial beach house, Getaway pits players in a tightly enclosed indoor location surrounded by a short- to mid-range boundary for more open combat. Stay light on your feet, as shotgun blasts and knife attacks will take out the unsuspecting without a moment of warning.

DLC - Lookout (Face-off Map)
A large outpost situated in the hills of the Korengal Valley, Lookout challenges players with close-quarters combat on the ground floor with clear sight lines above. Movement within the surrounding bunkers is very limited, although the elevated landscape and the ability to scale most structures lend a clear vantage point at the expense of exposure.
DLC - Vortex (Face-off Map)
An old ranch house sits threatened by the approach of a raging tornado. The front porch and sprawling shrubbery intensifies combat to the south with a tight line of sight. An open field stretches across the north, with a cornfield and central hill obscuring visuals, making ambush an ever-present threat.DLC - U-turn (Face-off Map)
A militarized highway cuts across a burning oil field, with damaged vehicles strewn about four vertical lanes. Minimal overhead cover increases the threat of aerial killstreaks and the surrounding clutter makes detection much more difficult. Keep a low profile, sweep the area, and get the jump on your target.DLC - Intersection (Face-off Map)
Four buildings circle a large cross street, encouraging players to dig in and fight it out across the map. Race out into the open and expect to quickly come under fire. Stick to the interior, protect your position with ground explosives, and book it only when the enemy starts pushing toward your location.DLC - Terminal
A classic return from Modern Warfare 2, Terminal drops teams in an evacuated airport. Battle rages across a security checkpoint, within the front lobby and along a parked plane out on the runway. Watch nearby corners, secure a perimeter and always control your surrounding lines of sight.DLC - Decommission
A nautical graveyard sprawls across a wide layout, with mid- to long-range sight lines dominating the surrounding environment. Strong fortifications allow teams to cover large pathways with minimal resources.DLC - Offshore
An off shore oil rig spreads combat across three platforms, leading to skirmishes at every turn. Multiple interconnecting bridges, cramped indoor locations and frequent stairwells constantly challenge navigation throughout.DLC - Boardwalk
A beachside amusement park spreads combat along three paths, divided between an open central platform flanked by the northern road and southern coastline. Prepare for both short- and long-range skirmishes alike.DLC - Gulch
An old mining settlement pitched deep inside a canyon, Gulch forms a wide open arena largely focused on mid- to long-range combat. Success relies on adapting to the landscape in order to best fortify high value locations.DLC - Parish
A militarized zone within New Orleans sets the stage with an abundance of close-quarters choke points, leading to frequent and fast-paced skirmishes at every turn. Strike swiftly and surely, and balance aggression with caution to turn this maze to your advantage.